Dining Room Chair Plans
Difficulty
Beginner
| 
Simple chairs with an upholstered seat. Comfortable and oversized with base supports.
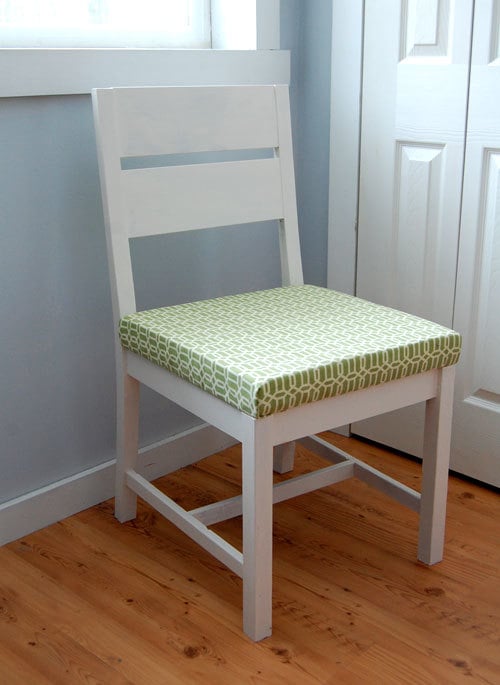
It's not that I didn't believe in you. Because on a daily - sometimes hourly- basis, you blow me away with your capabilities.
But I've resisted putting simple chair plans up because cutting back legs can be such a challenge. And while many of you have the skills, tools and abilities to make complicated cuts, I take great measures to simplify any design, and every effort to consider the most beginner skill sets, tiniest budgets, and the limited tools of the rest of us.
I will cut anything with a compound miter saw. I even cut that cushion foam with one (not advisable). But ask me to cut without it? I'll admit, it's not my favorite task. Because when you cut with a handheld saw, the results are not as precise and smooth as with a miter saw. Especially with 1 1/2" thick stock. But I'm so proud to tell you that these chair legs were cut by me, on the very first time, with a handheld saw.
And I couldn't be more pleased with the end result.
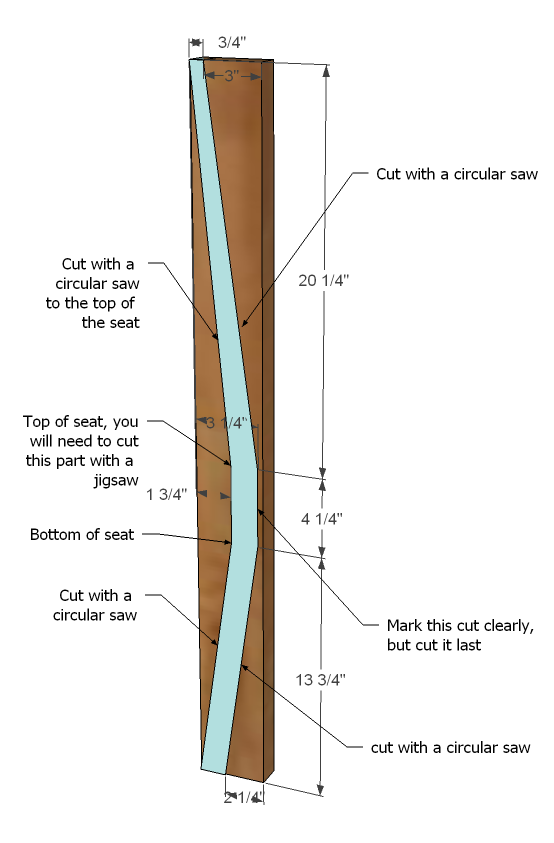
While those back legs may appear to curve, it's actually a straight cut with a circular saw, so no funny beveling and rough edges, telltale signs of a jigsaw blade. I did have to complete the cuts with a jigsaw, and then sanded the back legs with coarse sandpaper, but it really wasn't a ton of work. We are talking about an hour to build this chair.
And who can't use a classic chair? The padded seat was actually an afterthought, but a super simple modification that I will walk you through in the plan below.
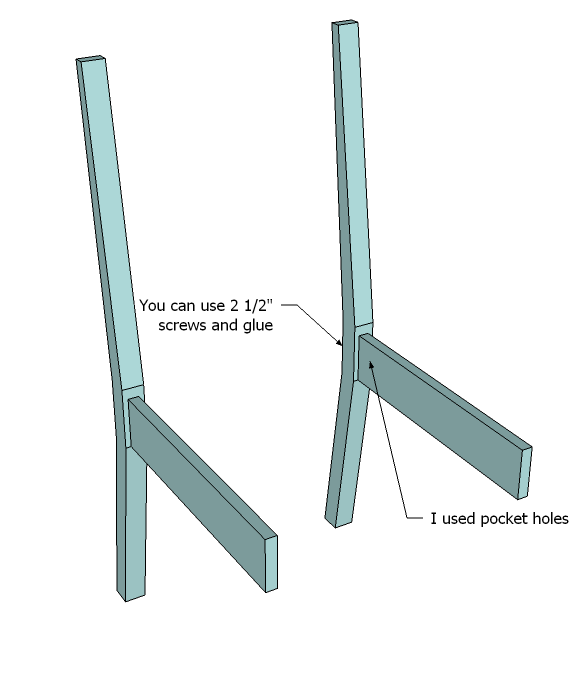
And this photo may help someone conceptualizing the chair better, so I thought I would post. I used pocket hole screws (highly recommended so you don't end up splitting your legs and a stronger joint) and inset the aprons slightly on the legs to point the pocket hole screws directly into the meat of the legs. Also I highly recommend adding corner braces or chair braces (metal) to the corners for added stability. I attached the cushion with pocket holes predrilled in the top edges of the inside of the aprons, with a 1" screw.
Dimensions
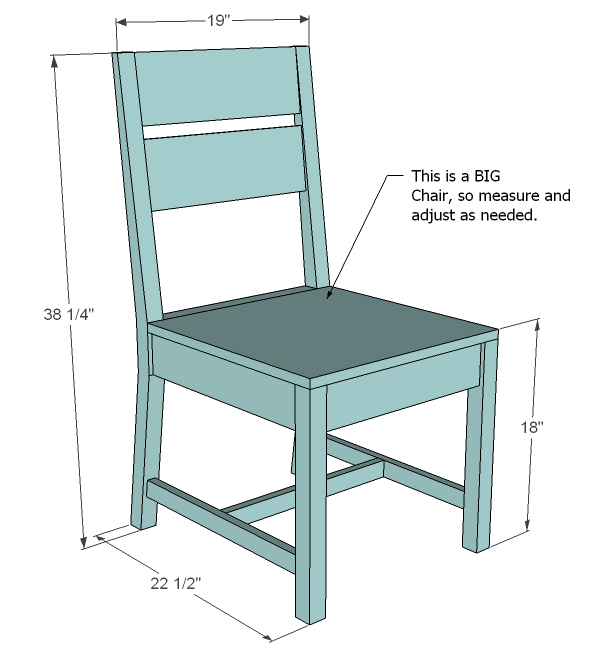
Dimensions are shown above. This is a BIG chair . . . just a little warning. You can easily modify the size by simply cutting the aprons to a smaller size.
Preparation
Shopping List
1×6 @ 3 feet long
1 – 2×2 @ 8 feet long
1 – 1×4 @6 feet long
1 – 1×2 @ 8 feet long
1 – 2×4 @ stud or 8 feet length
1 – 1/2″ scrap plywood for seat top, 19″ x 19″
1 yard of fabric
1 piece of foam, 19″ x 19″ 1″ thick
3/8″ staples
1 1/4″ pocket hole screws
Cut List
2 – 2×4 @ 38 1/4″ (Chair back legs)
2 – 1×4 @ 17 1/2″ (Side Aprons)
2 – 2×2 @ 17 1/4″ (Front Legs)
2 – 1×4 @ 16″ (Front/Back Aprons)
4 – 2×2 @ 4″ (Supports – both ends cut at 45 degrees off square, NOT parallel to each other)
1 – 1×2 @ 16″ (Seat Back Top)
2 – 1×6 @ 16″ (Seat Back)
2 – 1×2 @ 19″ (Longest point, one end cut at 8 degrees off square)
1 – 1×2 @ 16 3/4″ (Center Support)
1/2″ plywood @ 19″ x 19″ (Seat top)
Instructions
Step 1
Back Legs
If you follow these steps carefully, you can cut back legs that are straight and symmetrically to each other. Mark the legs as shown in the diagram. The front – where the chair leg connects to the side aprons – needs to be cut in 1/4″ to account for rounded edges on 2x4s. The goal is to make as many cuts as possible with a circular saw, but you will need to finish inside cuts on the back with a jigsaw. Follow the diagram above carefully. I advise taking the scrap piece of 2×4 and cutting a leg first from it to get some practice. Once your legs are cut, lay them together, and check to make sure that the top, bottom and front sides all match. The other parts are not as significant. Sand your cuts smooth.
Step 2
Side Aprons
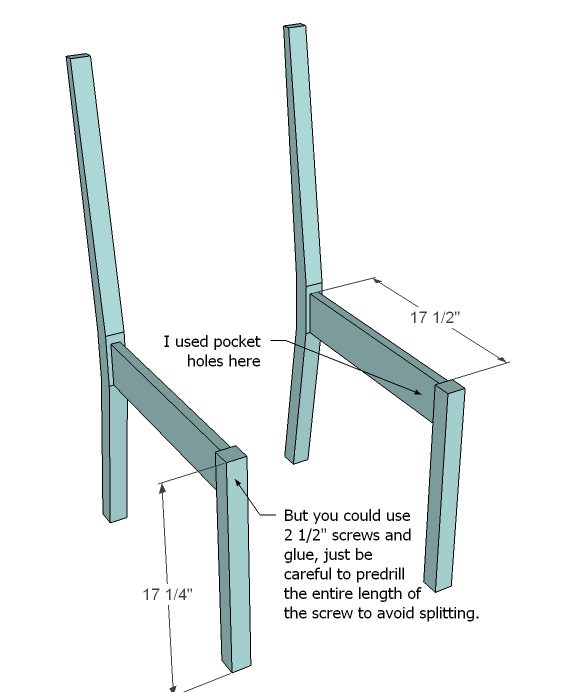
Attach the side aprons to the back legs, flush to the bottom of the front cuts on your chair back legs. Make sure the two leg pieces still match up – if not, your chair is going to be crooked!
Step 3
Front Legs
Attach the front legs to the side aprons as shown above. The tops are flush, and your chair part should match up at this point.
Step 4
Front/Back Aprons
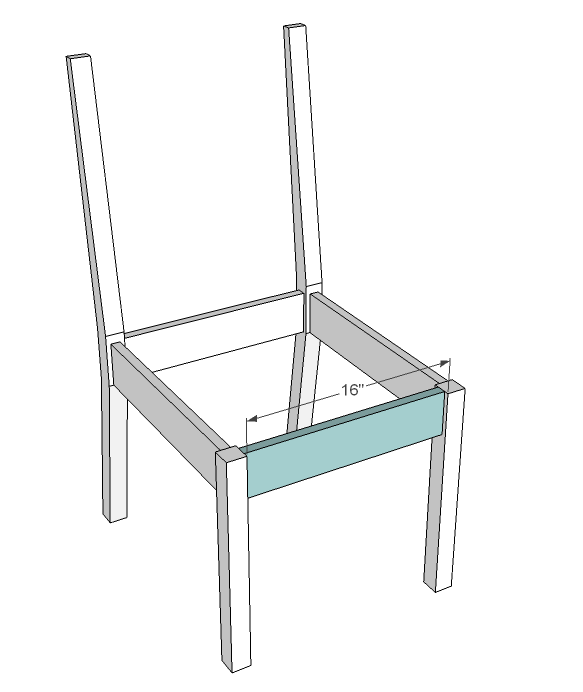
Attach the front and back aprons, carefully predrilling. I used pocket hole screws and glue. Top is flush.
Step 5
Step 6
Seat Back Top
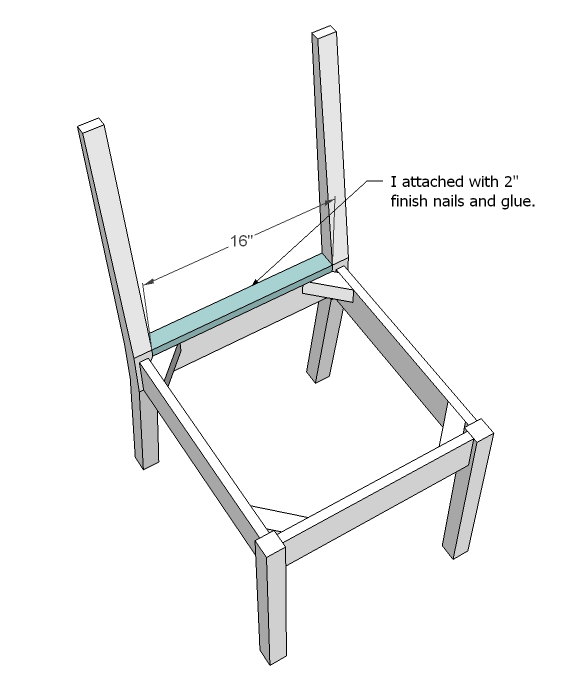
Attach the seat back top as shown above.
Step 7
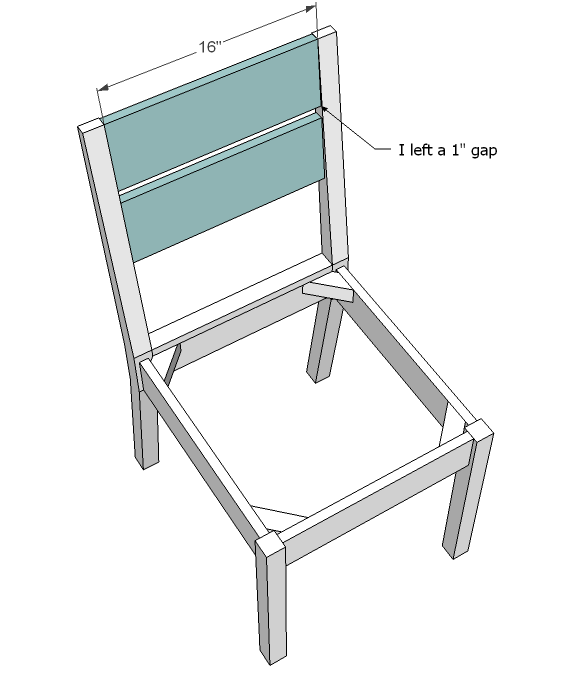
Seat back
I used pocket holes from the back but you can also use predrilled screws from the legs. Attach as shown above.
Step 8
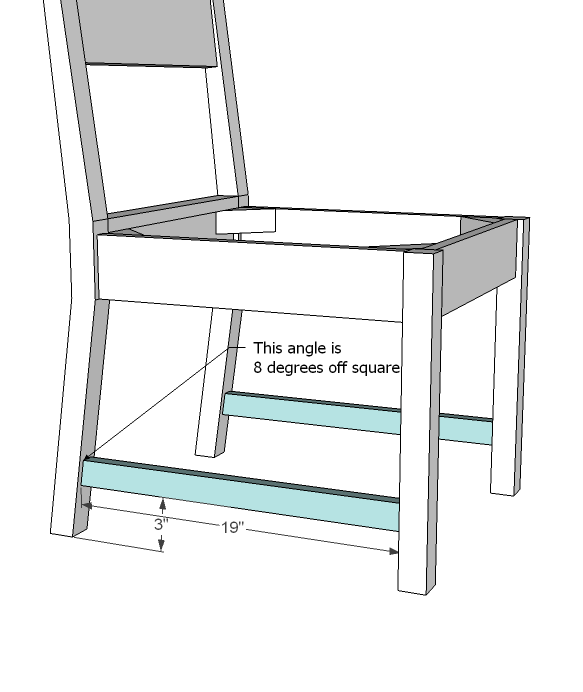
Base Support
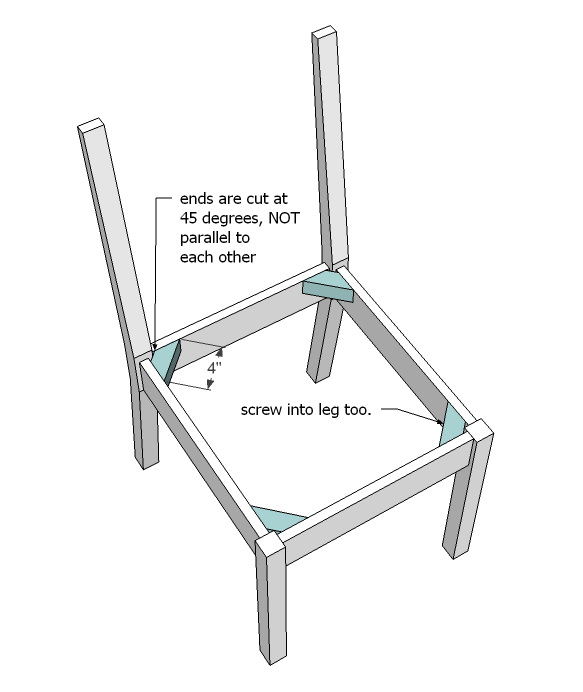
The base supports will add considerable strength to your chairs. Attach as shown above.
Step 9
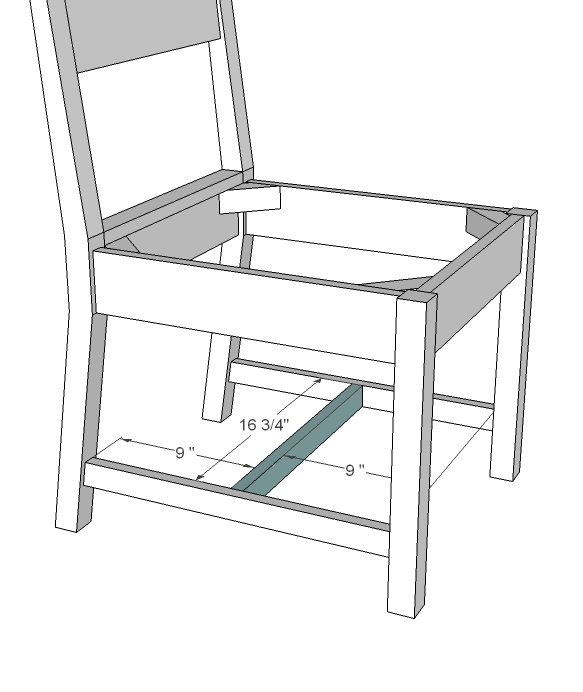
Base Center
Attach the base center to the sides as shown in the diagram above.
Step 10
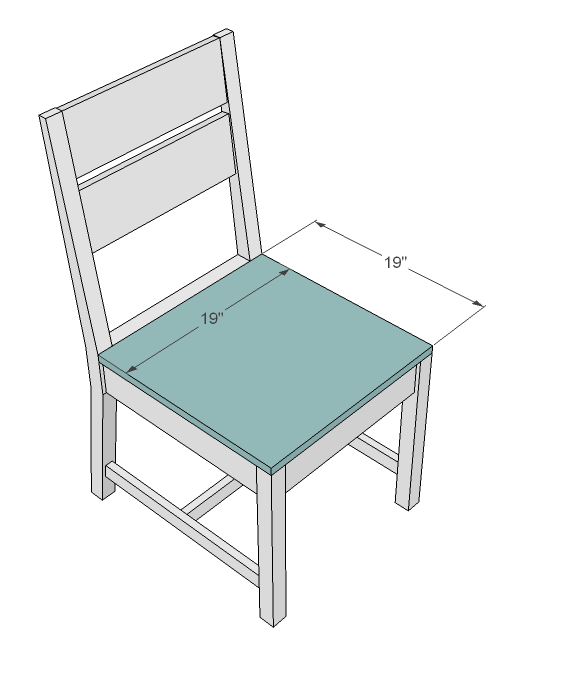
Seat
Spray glue the seat cushion to the seat top plywood. Lay fabric facedown on table with seat top on top of fabric, foam side down. Staple fabric carefully to the underside of the chair, tucking corners neatly. Use 2″ screws to attach the seat to the cross supports or use pocket hole screws.
Step 11
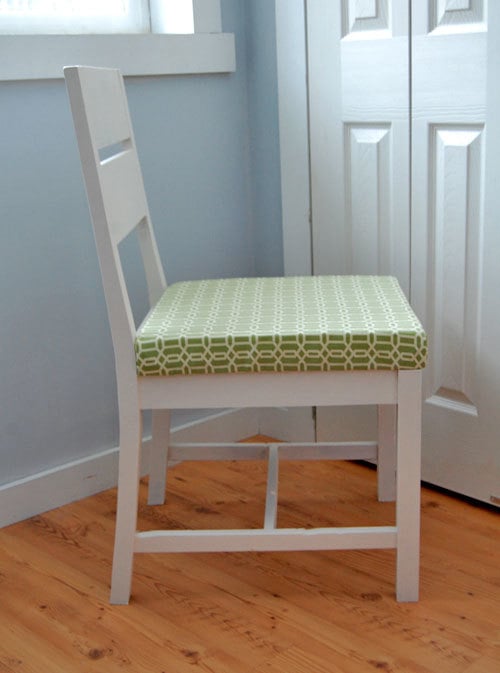
This chair was painted with Valspar Antique White in Flat Enamel, three coats. A top coat (Valspar satin finish poly) was added. The fabric is from Joanns, and is part of the Home Decorator's 45″ wide fabric, and was on sale for $5 a yard. For a foam pad, I used a discarded chair pad cut to size. Total cost of this chair was under $20.
Source: https://www.ana-white.com/woodworking-projects/classic-chairs-made-simple


Tidak ada komentar: